If you are interested in genealogy, this meeting might be of value to you.

If you are interested in genealogy, this meeting might be of value to you.
(See my other macOS articles) – We all use some of the standard keyboard shortcuts built into macOS such as ⌘+c to copy and ⌘+v to paste. If they don’t exist, you can create your own keyboard shortcuts for menu commands. You can do this with the software that is part of macOS. [1, 2]


Now that you have created the shortcut you can use it within the App. So for this example if I am in Mail and there is a message I want to save as a PDF all I have to do is enter CMD+Option+p on the keyboard.

The dialog box shown above is displayed and I can modify the title as desired. I can also set a Tag for the file. Using Tags is a useful way to manage your documents.
References / Further Investigation
(See my other Mac related posts) – While Apple’s Activity Monitor (Finder ==> Go ==> Utilities ==> Activity Monitor) does a great job of giving performance feedback, it takes time to fire it up. I like something that I can check performance at a glance.
I came across the MenuMeters App in the fall of 2021. I installed it on my Mac (2018 Mac Mini, macOS Big Sur 11.6) in mid-November. I have been running it ever since. One of the things I like about MenuMeters is that it is Free Open Source Software (FOSS).
What is MenuMeters? It is a set of CPU, memory, disk, and network monitoring tools for macOS.

Once installed, MenuMeter displays real-time data in each category within the Menu Bar.


Clicking on each icon will give you a pull-down panel with further information in each category. Going from left to right, the icons for Memory, Network, Disk, and Processor:


The Preference Panels for MenuMeters offers several configuration options to customize the App.
As with many modern programs, MenuMeters will automatically check for updates. MenuMeters is a port of the App developed by Alex Harper at http://ragingmenace.com. To get MenuMeters, visit https://member.ipmu.jp/yuji.tachikawa/MenuMetersElCapitan/. You will find links to download the App and instructions for installing it.
Pro:
Con:
Visit my macOS Software Directory page and find new software for your Mac. Currently, there are over 930 titles indexed with more than 300 available for FREE https://johnpurvis.wordpress.com/macos-software/
(See my other OS X related articles – I have had AppCleaner installed for a while and have used it a few times. This is a small Drag-and-drop App cleaner for macOS. It not only deletes the App but can also remove most of the files associated with the App. It is one of the software products from Freemacsoft. As the name implies, this is a FREE software product. I have used it a few times and it seems to both find most of the associated files.
As the name implies, this is a FREE software product. I have used it a few times, and it seems to both find most of the associated files.
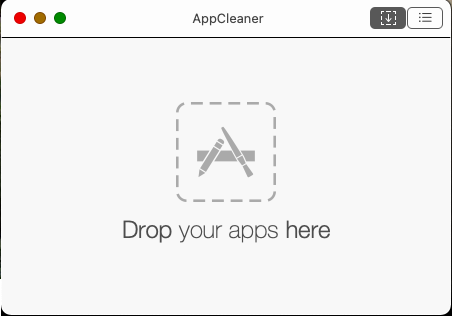
When you run AppCleaner you get a window that an App can be drug onto and dripped.

In the example above, I dropped Cisco Webex Meetings onto AppCleaner. As you can see above, AppCleaner found the App itself, two associated folders, and a plist file. Use the checkboxes to the left to select which you want to be deleted, then click on the Remove button at the bottom right.

I also have the App Hazel running on my Mac. As soon as I clicked the Remove button, Hazel identified a few more files associated with Cisco Webex Meetings. I can then let Hazel remove these additional files.
I consider this an App to install on all of my Macs. Part of the essential macOS Toolbox.
Visit my macOS Software Directory page and find new software for your Mac. Currently, there are over 900 titles indexed with more than 300 available for FREE

See my other Mac and macOS posts.
Sidecar is a feature beginning with macOS 10.15 and iPadOS 13. It allows you to use your iPad as an additional Mac display. I am fortunate that both my Mac and iPad are relatively new. If you want to try Sidecar you need to check that your equipment meets the requirements.
Many can take advantage of this feature when they are traveling with their laptop. It can be equally useful, though with your desktop. I have been an advocate of using multiple displays for years to extend my desktop. Recently the adapter driving the second display on my Mac mini failed. While I was waiting for the replacement to arrive, I tried out Sidecar. I have been very pleased with it. So much so that I now set up my iPad as my third display every time I work on the computer. You can see my desk configuration in the photo above.
I take advantage of the wireless connection over IEEE-802.4 Wi-Fi. That way I can plug in the USB-C cable to charge the iPad while using it as a display. There are times when I experience a little latency. That would be resolved if necessary by using a wired connection. I don’t do that often as the USB-C ports on my Mac mini do not supply enough power to charge the iPad. Since I am not using an Apple Pencil for graphic input this has not been an issue.
If you have one, you can also use an Apple Pencil on the connected iPad. You can use it for pressure-sensitive drawing or sketching in Mac Apps. You can also use the pencil as a pointing device on the display. Any Mac Apps that support drawing tablets should automatically work with Sidecar [1].
In a sense, Sidecar gives the Mac the touchscreen ability that several users have wanted. If you are contemplating buying a Mac Laptop with Touch Bar, Sidecar lets you ‘try before you buy’.
Sidecar utilizes the same technology as in Continuity. It uses Bluetooth to make the initial connection. Point-to-point Wi-Fi is then used for subsequent data transfers. The virtual display technology built into macOS sends the signal to the iPad. This is over an encrypted data stream for security. The low-latency connection sends video to the iPad. Likewise, user input signals are returned to the Mac [5, 11].
 Both macOS and iPadOS come with everything you need to run Sidecar. Sidecar must be initiated from the Mac. Apple provides a few different ways to connect your Mac to an iPad [2, 5]. I chose to use the System Preference panel method [8]. Just open System Preferences on your Mac and double-click on Sidecar.
At his point you have three options you can enable for your Sidecar display. First, you can optionally show the Sidebar on either the left or right side of your iPad screen. The Sidebar contains some commonly used controls. Use your finger or Apple Pencil to choose them. I have never used the controls so I have opted to disable that feature to gain a little more viewing space.
Some Mac laptops have a Touch Bar beneath the screen on the keyboard. This feature can be optionally added to the top or bottom of your iPad display. The Touch Bar controls will be for the window displayed in Sidecar. The last option is to allow double tap on your Apple Pencil. There are also multi-touch gestures you can use on the iPad display [2].
Once Sidecar is set up you can use it like any other display. To choose how the displays are arranged in relation to one another go to System Preferences. Now double-click on Displays and click on the Arrangement tab. Just drag your Sidecar display to where you want it.

The default mode and my preference is to have Sidecar extend my desktop. If that is the case you can just drag windows between the displays. You can also move the cursor over the green circle in the top left-hand corner of a window (see image above). A drop-down menu will appear and one of the choices will allow you to relocate the window to the Sidecar display.
On the other hand, you might want to use Sidecar in mirroring mode. That way an audience can view your Mac while you draw on the mirrored Mac screen on an iPad. You could also use this on a plane. Watch a video on your laptop while your neighbor watches it with you on the iPad. Best to do that with a cable rather than wirelessly though [12].
You can leave Sidecar on your iPad at any time to access the local Apps. You can take advantage of the iPad’s multitasking so you do not have to terminate Sidecar. Just swipe up from the bottom of the iPad screen. This will take you to the iPad’s Home Screen.

When you are done using the iPad App just touch the Sidecar icon to resume the Mac Display function. This will likely be in the recent-Apps portion of the iPad dock.
If your iPad has a keyboard such as Apple’s Smart Keyboard then it acts as an additional Mac keyboard while Sidecar is running [10]. You can also use multi-touch gestures on the iPad. Gestures must be enabled on the iPad. Go to Settings -> Hone Screen & Dock -> Multitasking. Make sure that Gestures are turned on (green) [4]. The most common gestures are:
You can use Continuity Sketch to create a drawing on the iPad and add it to a document on the Mac. You can use your finger or an Apple Pencil in Continuity Mark Up. That will let you sign or mark up documents [5, 11].
Not all Macs and iPads can run Sidecar. The general requirements are that:
For a full list of the requirements check Resources 1, 2, & 3 below.
Visit my macOS Software Directory page and find new software for your Mac. Currently, there are over 870 titles indexed with more than 270 available for FREE

I like to try out new Mac Apps that I come across. One that I found today is MacLampsX. This one seemed appropriate for the season.
What does it do? it puts a border of Christmas lights and ornaments around the perimeter of your Mac computer screen. It can also simulate snow on the screen.
This is a ‘just for fun’ App. It doesn’t do anything other than bring some Christmas spirit to your display. The App has been around for a few years. At lease since 2005. It has been updated (version 3.0b3) recently enough to run without problem on macOS Big Sur 11.0.1. A few ‘third-party’ downloads are available with add-on bulb types so that you can customize your display.
if you want to make your desktop more of the Holiday season, this is an App you should try.
Pros
Visit my macOS Software Directory page and find new software for your Mac. Currently, there are over 750 titles indexed with more than 240 available for FREE https://johnpurvis.wordpress.com/macos-software/
See my other macOS posts

(See my other macOS related posts) – The name of the latest version of the Mac operating system is Big Sur. The announcement of Big Sur came at WWDC on June 22, 2020. It became available for users to download and install beginning on November 12, 2020.
Big Sur marks a significant change in the macOS. Macs have been running version 10 since March of 2001. This version of the OS moves to version 11.
So what will you find different in Big Sur? There are many incremental changes. The highlights of the improvements in Big Sur are listed below. The reading list provides links to where you can find more detailed information.
Read / See more about Big Sur
Odessa, Ukraine – Xwavesoft today is happy to announce a Back-to-School sale on their entire range of macOS and iOS applications. Starting on August 31, all their applications on Mac and iOS App Stores will be offered at a 60% discount. The range consists of widely known applications, where the most effective productivity techniques are incorporated to help people maximize their time, avoid burnout, and get rid of procrastination.
Acknowledging the worldwide research about Work-Life balance, the Xwavesoft team are excited about the chance to help people manage their time more effectively, and easily align their daily routines in order to achieve better results. These apps increase personal productivity and helps to focus on things that really matter naturally organizing plans, projects, and ideas in a clear way for faster goal achievement.
* Be Focused Pro (Mac) – $4.99 (USD) – now $1.99 (USD)
* Be Focused Pro (iOS) – $1.99 (USD) – now $0.99 (USD)
*Focus Matrix (Mac) – $9.99 (USD) – now $3.99(USD)
* Focus Matrix (iOS)- $4.99 (USD) – now $1.99 (USD)
* Cloud Outliner (Mac) – $9.99 (USD) – now $3.99 (USD)
* Cloud Outliner (iOS) – $2.99(USD) – now $0.99 (USD)
* eXtra Voice Recorder (Mac) – $4.99 (USD) – now $1.99 (USD)
* eXtra Voice Recorder (iOS) – $1.99 (USD) – now $0.99 (USD)
* Chrono Plus (Mac) – $4.99 (USD) – now $1.99 (USD)
* Chrono Plus (iOS) – $1.99 (USD) – now $0.99 (USD)
* Daily Habits (iOS) – $2.99 (USD) – now $0.99(USD)
* Christmas Gift List (iOS) – $2.99 (USD) – now $0.99(USD)
* Guest List Organizer (Mac) – $9.99 (USD) – now $3.99 (USD)
* Guest List Organizer (iOS) – $4.99 (USD) – now $1.99 (USD)
* Top Contacts (Mac) – $9.99 (USD) – now $3.99 (USD)
* Top Contacts (iOS) – $4.99 (USD) – now $1.99 (USD)
* Magic Cutter (Mac) – $9.99 (USD) – now $3.99 (USD)
The discount in the Mac App Store and iOS App Store is valid from Monday, August 31 through Saturday, September 5.
(See my other Tech Tip related posts) – We have all used the Textedit App on our Macs. But do you know all that it can do for you? The article “10 Things You May Not Know You Can Do With TextEdit On a Mac” helps to fill in some of the gaps in our Textedit knowledge.
I like this short (11:30) video from MacMost which explains some of the features of Textedit. MacMost uploaded the video to YouTube in April of 2020.
I have used Textedit for years, but I learned a few new things from watching this video. Their tagline for the video is:
TextEdit seems like a simple text editing tool, but it actually has some pretty rich features. You can do things like set document properties, edit code, define and use styles, insert images, audio, and video, and even export HTML documents.
See my other Mac and macOS related posts

(See my other Tech Tip related posts) – I recently traveled again to Henderson, NV to visit family. I knew that I would be here for a while, so I brought my Mac Mini. Its size and solid-state drive make it easy to travel with.
I have a monitor available at the location I was headed to but I will need a keyboard and mouse. I chose not to bring the keyboard and mouse from my desk at home. I had secured the cables for those under my desk. I brought along instead a generic keyboard. This Windows keyboard works well, but the key layout isn’t the same as my Apple keyboard at home.
The video above is from the suggested Further Reading
There turns out to be a simple solution for this. Remap the keys to the more familiar Mac layout. I followed the procedure outlined in the video. Now the keyboard layout is Mac-friendly and much easier for me to use.
The desire is to remap the Modifier Keys. On a Windows keyboard those keys on the left-hand side are in the order:
Control Command Option
On an Apple keyboard the order is:
Control Option Command
I have been using the Apple keyboard for a decade. It is difficult to change typing behavior. By remapping the Modifier keys my typing becomes more efficient. This also means that I become a fraction more productive.
Further Reading
See my other Mac and macOS related posts
